 I wrote this MQTT tutorial to help me out in the future, but hopefully it helps someone else along the way!
For the last few years I’ve been running a custom weather website. This website, in conjunction with weewx, allowed me to have a website which updated itself every 10 seconds. But this bothered me. 10 seconds was far too slow for my liking!
Earlier this year (2018) I started using Home Assistant for home automation (goodbye old unreliable cloud-based automation!) and they opened me up to MQTT. It was great to be able to get data from tiny Arduino sensors around the house – but I knew I could do more with it. That’s when I saw an MQTT extension available for weewx. I knew it was time for a website upgrade!
The result was a true real time auto updating website with no delay! Every time my weather station sends an update from the backyard (every 2.5 seconds), that data is immediately read by weewx which archives the data, runs some QC checks on it for accuracy, then publishes it to MQTT. Visitors on my website auto-subscribe to the MQTT topic through websockets and JavaScript updates the data on the webpage within milliseconds. It’s really cool!
If you’re not familiar with MQTT, it’s a machine-to-machine internet of things (IoT) communication protocol. Initially designed as a lightweight publish/subscribe method useful for those devices in remote locations with limited internet connectivity. It even works great for Arduino or NodeMCU temperature sensors around the house. The device that needs to send data would publish to a topic, and the device that needs to receive that data would subscribe to that topic. Topic names are arbitrary, but they should make sense. For example a topic could be weather/weewx/loop. This could mean it’s the weather parent category, the weewx software, and the loop function. Then you could have weather/weewx/archive for archive data, weather/rain_bucket/current if you had a rain bucket that can talk MQTT. Whatever you want!
I have weewx configured to publish weather loop data to the topic weather/weewx/loop, and my website is configured to subscribe on that topic.
Due to the high nature that weewx publishes weather data (currently my loop is at 2.5 seconds), I couldn’t use a free MQTT broker (or server), and I didn’t want to pay for access to one. Some free ones will handle the frequent data, but offer no uptime reliability, so I decided to install my own broker.
- Total time to setup: 5 – 30 minutes.
This tutorial was created in 2018 using Ubuntu 18.04, so some things may be different after I write this or if you use another operating system.
You can run MQTT on a Raspberry Pi, but I recommend running MQTT on a cloud server because it’s always available, fast and easy. You can start your DigitalOcean Ubuntu server for as low as $5/mo and be online in 1 minute. Best yet, if you use this link you get $10 credit for free!
Install Mosquitto
First install Mosquitto, which is the name of the MQTT software.
sudo apt update
sudo apt-get install mosquitto mosquitto-clients
If you stopped here and did sudo service mosquitto start you’ll have a very basic and working MQTT broker on port 1883 with no user authentication. You also won’t have websockets yet. Websockets are needed if you have a website that needs to connect to your MQTT broker.
Setup websockets
If you plan on using your MQTT Broker for a website, like the Belchertown weewx skin, then you need to enable websockets.
Let’s create a custom configuration file that we’ll add this – and other items – to for Mosquitto’s config. Run sudo nano /etc/mosquitto/conf.d/myconfig.conf and update it with the below:
persistence false

# mqtt
listener 1883
protocol mqtt

# websockets
listener 9001
protocol websockets
Make sure you have no empty spaces at the end of those lines or Mosquitto may give you an error.
Restart Mosquitto with sudo service mosquitto restart and you should now have a working MQTT server on port 1883 and websockets on port 9001!
Create a user and access control
I locked down my broker so that only those clients who know the password can publish to a topic. You can get super granular here where certain usernames can publish to certain topics only. For my sake I only have 1 user who can publish. All other users who connect to the broker are considered anonymous and can only subscribe. Create a password for publishing with:
sudo mosquitto_passwd -c /etc/mosquitto/passwd <your username>
Next is to create an MQTT ACL (access control list) so that anonymous users are read only, but the weewx system can read and write to the weather topic. Run sudo nano /etc/mosquitto/acl and enter in:
# Allow anonymous access to the sys
topic read $SYS/#

# Allow anonymous to read weather
topic read weather/#

# weewx readwrite to the loop
user <your username from above>
topic weather/#
Add to the custom broker configuration
Now let’s add the authentication and access control to the custom configuration file. Run sudo nano /etc/mosquitto/conf.d/myconfig.conf and enter in:
allow_anonymous true
password_file /etc/mosquitto/passwd

acl_file /etc/mosquitto/acl
Mosquitto is VERY PICKY – if you have a space in the wrong place, it will send an error. Make sure there are no spaces after any word at the end of the line.
Save your file and run mosquitto with mosquitto -c /etc/mosquitto/mosquitto.conf and with another SSH client, log into your server and check that the MQTT ports are open. Run this command sudo netstat -tulpn | grep 1883 and you should see port 1883 open. Repeat with port 9001 to verify websockets are open. It should look something like:
tcp 0 0 127.0.0.1:1883 0.0.0.0:* LISTEN 973/mosquitto
If it’s open like above then open 2 more SSH connections to your server to test publish and subscribe.
Session 1: run this command to subscribe to the weather topic.
mosquitto_sub -h localhost -t weather/#
The # means you want to listen on everything underneath weather. For example weather/topic1, weather/topic2, weather/topic3, etc.
Note: Only use # when troubleshooting. You shouldn’t setup your website or application to publish or subscribe to # in a normal situation.
Session 2: try to publish using this command:
mosquitto_pub -h localhost -t "weather/test" -m "hello world"`
This command does not use any authentication so it should fail! Your mosquitto_sub window should not show anything. If you do not see anything, so far so good!
Now go back to SSH #2 (with the mosquitto_pub) and run this command which has authentication:
mosquitto_pub -h localhost -t "weather/test" -m "hello world. this is to the weather topic with authentication" -u "<your username from above>" -P "<your password you created>"
You should see something in your mosquitto_sub window now! If you do, great! If not, back up and try everything again. Sometimes Mosquitto is fussy and requires a full reboot. You can also check the Mosquitto log file at /var/log/mosquitto/mosquitto.log
So if you’ve made it this far you have a working MQTT broker with authentication and websockets!
Setup LetsEncrypt SSL certificate (optional)
If your MQTT broker is going to be used for weather data, this is probably overkill. But you can use SSL with a free certificate from Let’s Encrypt. You will need to have a dynamic DNS hostname setup for your home IP. A provider like duckdns.org can help make this easy. Dynamic DNS is a service that allows you to have a hostname, like myhomemqtt.duckdns.org that is always pointing to your IP – even when your internet provider changes your IP on you.
If you are running your broker at home (on a Raspberry Pi or something), then you need to setup Dynamic DNS so that the Let’s Encrypt certbot can reach your server for validation from the internet. Admittedly, this is where having a cloud server is easier since there is no port forwarding to mess around with.
Also, please read the setup guides for the Dynamic DNS provider you use. Some require a small bit of software to run so that it detects a change in your IP and it updates your hostname.
The first step is to install a web server which will do the verification that you are who you say you are. I prefer NGINX (pronounced engine-x), but you can use Apache if you’re comfortable with it. Run sudo apt install nginx and once that’s done, you should have a working web server. Make sure you port forward or open these ports on your server’s firewall: 80, 443, 8883, 9001 .
- Port 80 is HTTP
- Port 443 is HTTPS
- Port 8883 is MQTT SSL
- Port 9001 is Websockets SSL (for the website)
At this point you should be able to go to http://myhomemqtt.duckdns.org and see the website that says something like “Welcome to NGINX!”. Try it from your cell phone (not on WiFi) which will double check that the outside world can see it, too. If so, install the Lets Encrypt certbot with sudo apt install certbotand create the folder the certbot will use. mkdir -p /var/www/html/.well-known – (Hint: even when we’re done, don’t delete this folder since the automated renewals will use it in the future)
Update NGINX to allow all access to the new .well-known folder by running sudo nano /etc/nginx/sites-available/default and below the location /{ section, add this:
# Let's Encrypt
location ~ /.well-known {
  allow all;
}
Restart nginx with sudo service nginx restart
Now attempt to get an SSL certificate with
sudo certbot certonly -a webroot --webroot-path=/var/www/html -d <your dynamic dns hostname>
Replace with what you selected above -- like `myhomemqtt.duckdns.org`.
Follow the prompts and at the end you should see:
IMPORTANT NOTES:
- Congratulations! Your certificate and chain have been saved at:
Great! You’ve got yourself a working SSL certificate! If you did not see that above, go back and try again. Make sure your server is available externally. Make sure the .well-known folder is also available externally. There are plenty of resources on Google for getting Let’s Encrypt working with NGINX.
The certificates are only good for 3 months, so you’ll want to setup automatic certificate renewals. It’s easy by typing crontab -e and adding this at the end of the file:
# LetsEncrypt renewals every Monday at 2:30 am
30 2 * * 1 /usr/bin/certbot renew >> /var/log/le-renew.log
Add your SSL cert to MQTT config
If all you’re using your MQTT broker for is weather data, then the SSL can be considered optional since it’s just weather data. But setting up Let’s Encrypt is about a 10 minute process, so it makes sense to go the extra mile and make sure everything is secured.
Update your custom MQTT config file and add the new SSL certificates. Run sudo nano /etc/mosquitto/conf.d/myconfig.conf and update it with the below:
persistence false

allow_anonymous true
password_file /etc/mosquitto/passwd

acl_file /etc/mosquitto/acl

# Insecure mqtt to localhost only, and secure mqtt
listener 1883 localhost
listener 8883
certfile /etc/letsencrypt/live/myhomemqtt.duckdns.org/cert.pem
cafile /etc/letsencrypt/live/myhomemqtt.duckdns.org/chain.pem
keyfile /etc/letsencrypt/live/myhomemqtt.duckdns.org/privkey.pem
protocol mqtt

# websockets
listener 9001
certfile /etc/letsencrypt/live/myhomemqtt.duckdns.org/cert.pem
cafile /etc/letsencrypt/live/myhomemqtt.duckdns.org/chain.pem
keyfile /etc/letsencrypt/live/myhomemqtt.duckdns.org/privkey.pem
protocol websockets
Where myhomemqtt.duckdns.org is the name of your hostname or dynamic DNS.
This setup makes MQTT port 1883 available to localhost only, and opens 8883 for the outside world, and it uses your new SSL certificates.
Restart your mosquitto server with sudo service mosquitto restart and check that the ports are open with sudo netstat -tulpn | grep -E '8883|9001'. You should see something similar to:
tcp 0 0 0.0.0.0:9001 0.0.0.0:* LISTEN 973/mosquitto
tcp 0 0 0.0.0.0:8883 0.0.0.0:* LISTEN 973/mosquitto
tcp6 0 0 :::8883 :::* LISTEN 973/mosquitto
That should do it! At this point you should have a working MQTT broker which uses SSL!
If you have any questions, or see room for improvements, let me know in the comments.
]]>
 I have 2 Nest thermostats in my house. They’re great! No doubt they have saved me money since the first day. The one thing that’s bothered me though is the lack of push notifications. Perhaps it’s overkill but I like to know what my thermostat is doing such as changing setpoint and operation mode.

 When something on my Linux servers needs to send email (WordPress, Nagios, cron scripts, etc), I use mailx. With the spam filters everyone has a lot of my automated emails haven’t been reaching their destination. I’ve done the SPF rules and making sure my forward matches my reverse DNS lookups; even have done DKIM. Can’t seem to find a reliable option with sending email from the command line without it getting flagged for spam.
 I love Nagios and I love Raspberry Pi’s. With my growing smart home and other projects, it only makes sense to monitor it all. To do that I use a Rapsberry Pi to run Nagios for low-cost reliable monitoring. I had Nagios running on a Virtual Machine but freeing up those resources and putting an old Pi to use is perfect.

 I’m a huge fan of Nagios. I’ve installed it at work and it provides us simple up/down information, as well as detailed service information. Being able to customize the level of monitoring detail has been a huge benefit. Nagios doesn’t just stop at the workplace – I run it at home too.
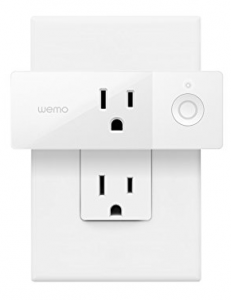 I had a situation recently where the GFCI outlet that my air conditioner’s condensate pump was plugged into had popped it’s breaker and turned off my pump. This caused an overflow and a small flood in my basement. I don’t go to my basement everyday, but thankfully I went down for something and caught the flood before it was bad. Who knows how long it would have been overflowing had I not gone down there. I needed a solution.
